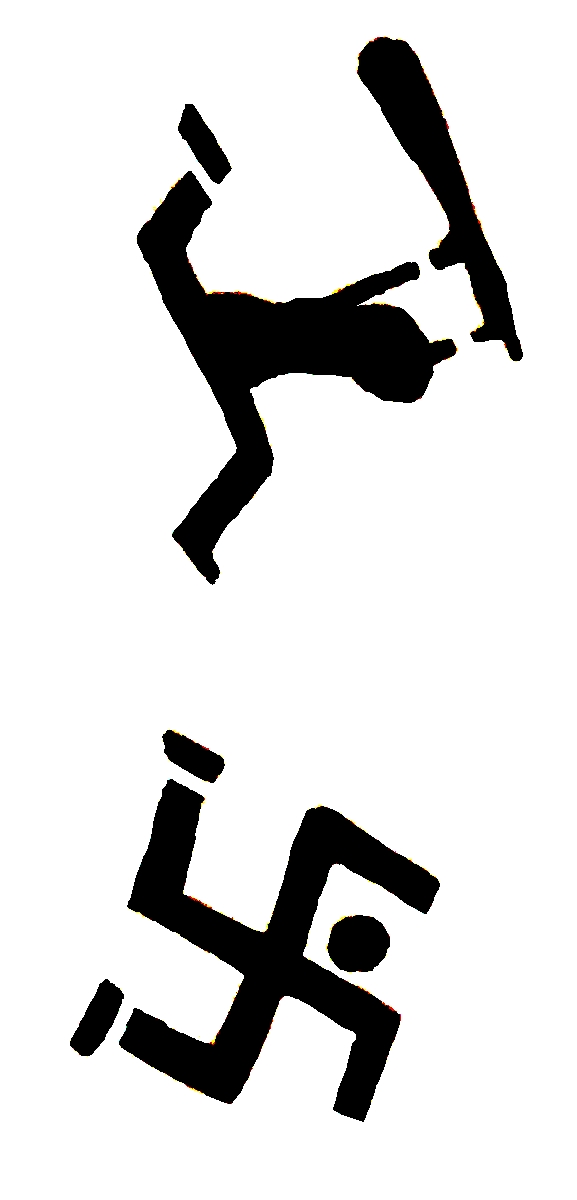
Based off a great Twitter thread earlier today, I’ve cleaned up this version of a ‘Nazibasher’ stencil design. More anti-fascist art can be found here on Pinterest.
My compliments to the original stencil maker. I’d love to cite you but we both know that may not be safe.
Disclaimer: I’m making no money off this artwork. I do not advocate its use to deface public property, and I do not mean it to refer to or incite actual physical harm to Nazis, alt-right fascists, and their sympathizers.
There’s a lot of art uses for stencils, beyond vandalism. Something that Donald Trump may not grasp, but his conservative friends and Putin damn sure know.
Here’s the stencil, in vertical layout to fit more easily on a page. It’s saved as a JPG file, 150dpi at around 8″ high. Copy, share, enjoy.
Here’s my how-to thread, expanded slightly from Twitter:
1 If anyone wants to know how to cut this as a spray stencil, I can show you. *For art purposes, ahem*.
2 First, kudos to the original designer. I’d cite you but you might not want your name publicized.
3 Save image into Photoshop, Painter, or any illo program of your choice. Split image into 2 parts, enlarge each to fit 8.5×11 paper.
4 Print your design on regular 20lb bond paper. Use graphite paper or lightbox (or window) to transfer image w/ black Sharpie or other permanent marker.
5 Have cardboard or cutting mat (don’t cut on a surface you want to keep pristine!)
Use sharp X-acto craft knife to cut out black areas (cells) only. Don’t cut into white areas – those will be part of your stencil material.
If you haven’t cut stencils before, practice a bit first. When doing sharp corners, cut into the point from both sides – it helps control the cut and avoid over-cutting into the stencil material.
6 Or have a friendly laser cutter owner do this. Do not approach commercial sign printers unless they are #Resistance!
7 Make multiples if you need to. Different stencil materials have varied lifespans. Spray-varnished cardstock paper will do in a pinch, but I prefer thin stiff Tyvek (Try Yupo plastic watercolor paper!) or polystyrene craft stencil plastic. If you use raw paper, it can get clogged, distorted, or torn more easily. Also, it’s a lot harder to store between uses.
8 Set up a binder or notebook with waxed paper or plastic sleeves (slit down outside edge) or 1/2 page ‘pocket’ type. These will store your stencils between use. You may also need a reclosable plastic bag big enough to hold your binder (and maybe a canvas shopping bag for portability).
9. Other obvious and handy things are nylon (not latex!) disposable gloves to keep your hands clean, and 1″ masking tape to help hold down your stencil while you’re painting with it.
10. Choose your paint! Liquid acrylic can be daubed on with a short, stiff stencil brush, for a fuzzy outline on a canvas or paper piece. Paint pens come in oil-based enamel or water-based acrylic, and can fill small stencils quickly. Spray paint comes in oil-based enamel or water-based acrylic, and is the fastest method to get full coverage.
11 Pick your surface! Smooth canvas, paper, or other flat surfaces will give the crispest image, while rough surfaces may be hard to tape the stencil to, and give a ragged-edged image with uneven coverage. That’s okay: the human tendency to pattern-match means that even a rough-looking stencil will be easily deciphered and have an iconic charm.
12 Spray, pull off stencil, fold tape over edge or pull it off (and dispose of cleanly and discreetly!) Stow stencil in binder & paint can in shopping bag. Repeat as desired.
Here’s a molding paste stencil background used on linen, with a dimensional paint drawing overlay. Because phoenixes are cool and appropriate for rebellions and justice.
![]()
13 Stiff acrylic gels, either clear or buffered with pigment or white filler, can create molding paste plaster effects on flat art surfaces. (See my Phoenix sample above). Apply them with clean flat plastic or metal scrapers, fill in the stencil, scrape off the excess, and immediately pull up the stencil. This gives a low-relief design.
14 Hope this helps you artists out there, with a neat new trick for your skillset! I’ve been cutting stencils for 21 years, often commercially, and they’re amazing time-saving tools.
***
For more #Resistance stencil fun, here’s the Star Wars Starbird design I used on the back of my Legionnaire Pussyhat.
